Looking to take your hairstyle to the next level? Want to turn heads with a stunning and trendy look? Well, look no further! Braid extensions with bobby pins are here to revolutionize your hair game. Whether you have short locks or long tresses, braid extensions can transform your hair into a masterpiece. Read this article for more information on how to create beautiful cornrow hairstyles using bobby pins.
Imagine effortlessly adding length, volume, and style to your hair in just a matter of minutes with braid extensions. By using a bobby pin or latch hook, you can achieve the hairstyle of your dreams without waiting for your natural hair to grow. This article will show you how to cornrow your hair with these extensions, giving you the gorgeous locks you’ve always desired.
These versatile beauties, also known as bobby pins, are suitable for all hair types and textures. Whether you have straight, wavy, or curly hair, cornrow braid extensions will seamlessly blend in with your natural locks. Plus, they provide endless possibilities. From elegant updos to boho braids and everything in between – there’s no limit to what you can create with the latch hook tool.
So how do these magical braid extensions with a latch hook or crochet needle work? It’s simple! Using a latch hook or crochet needle, each extension is carefully attached to your own hair. The process is quick and painless, ensuring a comfortable experience from start to finish.
Get ready for step-by-step tutorials and expert tips that will make you a thumb latch hook pro in no time!
Ready to elevate your hairstyle game with cornrow braid extensions? Let’s dive into the wonderful world of braiding techniques together, using your hand and a latch hook.

The Basics of Braid Extensions: Step-by-Step Instructions
Master the fundamental techniques of braiding hair with extensions.
Braiding hair with extensions using the latch hook technique can give you a stunning and versatile look. It’s important to master the fundamental techniques, such as cornrow braiding and creating loops, to achieve flawless results. Whether you’re a beginner or have some experience, these step-by-step instructions will guide you through the process of hand braiding with extensions.
Start by gathering all the necessary tools and products for cornrow v4. You’ll need bobby pins, hair extensions, a rat-tail comb for sectioning, and a styling gel or edge control product for added hold. Once you have everything ready, follow these steps using your thumb and index.
Section your hair: Begin by creating a clean base for your braid extensions. Use the rat-tail comb to divide your hair into small sections. This will make it easier to work with and ensure that each braid is secure.
Add the extensions: Take one section of your natural hair and attach an extension to it using the base braid technique. To do this, separate a small portion of your natural hair as if you were starting a regular braid. Then, add in some extension hair and continue braiding as usual.
Secure with bobby pins: Once you reach the end of your natural hair, use bobby pins to secure the extension in place. This will prevent it from unraveling and keep your braids intact for longer periods.
Repeat the process: Continue working through each section of your hair, adding extensions as you go along. Remember to maintain consistent tension throughout each braid for a neat and uniform look.
Follow our easy-to-understand step-by-step guide for flawless braid extensions.
Creating flawless braid extensions with natural hair strands doesn’t have to be complicated! By following our simple step-by-step guide, you’ll be able to achieve professional-looking results in no time. Start by sectioning the hair and then take a cornrow-sized strand. Hold it between your thumb and index finger, and begin braiding using the v4 technique. Repeat this process until all the hair is braided.
Prepare your workspace: Find a comfortable and well-lit area to work in. Having a clear workspace will make it easier for you to focus on each braid and ensure accuracy.
Detangle your hair: Before starting the braiding process, make sure your hair is thoroughly detangled. This will prevent any knots or tangles from interfering with the extension application.
Apply styling product: Apply a small amount of styling gel or edge control product to each section of natural hair before adding the extensions. This will help create a smooth base and provide extra hold for your braids.
Start with the base braid: Begin by creating a base braid using your natural hair as the foundation. Take a small section of hair at the front and divide it into three equal parts. Cross the right strand over the middle, then cross the left strand over the new middle strand. Repeat this process, gradually adding in extension hair as you go along.
Continue braiding with extensions: As you reach the end of each braid, add more extension hair to create length and volume. Make sure to secure the extensions tightly with bobby pins to prevent them from slipping out.
Repeat until complete: Repeat steps 4 and 5 for each section of your hair until all desired areas are covered with braid extensions.
Learn how to create a solid foundation for long-lasting and secure braids.
Creating a solid foundation is crucial for a successful hair extension. Follow these tips to ensure that your braids stay intact for an extended period. Check out our extensions hair tutorial for a step-by-step guide. Use your thumb to secure the v4 hair extension in place.
Divide your natural hair into smaller sections: Working with smaller sections allows you to have better control over each thumb braid, resulting in more secure attachments.
Use quality extension hair for your thumb: Opt for high-quality synthetic or human hair extensions that match your natural texture and color. This will not only enhance the overall look but also provide better longevity for your thumb.
Secure the base tightly with a few stitches before adding extension hair to create a strong foundation for the thumb braid. This will prevent unraveling and withstand daily activities.
Apply enough tension with your thumb: Maintaining consistent tension throughout each braid is essential for a uniform and secure look. Avoid pulling too tightly with your thumb, as it can cause discomfort or damage to your natural hair.


Choosing the Right Hair Extensions for Braiding
Explore Various Types of Hair Extensions Suitable for Braiding Styles
Choosing the right hair extensions is crucial to achieving the desired look. There are various types of hair extensions available in the market that are suitable for different braiding styles. Let’s take a closer look at some popular options for thumb braiding.
Synthetic Hair Extensions: Synthetic hair extensions are affordable and come in a wide range of colors and textures. They are made from synthetic fibers such as Kanekalon or Toyokalon, which mimic the look and feel of natural hair. Synthetic extensions are great for temporary braided styles or experimenting with bold colors.
Human Hair Extensions: Human hair extensions offer the most natural appearance and can be treated just like your own hair. They blend seamlessly with your natural locks, providing a realistic look and feel. Human hair extensions can be styled using heat tools, colored, and even washed regularly.
Braiding Hair: Specifically designed for braided hairstyles, braiding hair is usually made from synthetic fibers but has a more natural texture compared to regular synthetic extensions. It is often pre-stretched to minimize tangling and can be used for various braid styles such as box braids, cornrows, or Senegalese twists.
Crochet Braids: Crochet braids involve attaching loose strands of synthetic or human hair onto cornrowed natural hair using a crochet hook. This technique allows for versatile styling options while protecting your natural locks underneath.
Consider Factors Such as Texture, Length, and Color When Selecting Hair Extensions
To achieve a seamless blend between your natural hair and the extensions, consider these factors when selecting the right ones:
Texture: Match the texture of your own hair with that of the extensions to ensure they blend well together. If you have naturally curly or wavy hair, opt for extensions with similar textures. For straight hair, go for sleek and smooth extensions.
Length: Choose extensions that complement your desired braid length. Whether you prefer short, medium, or long braids, ensure the extensions are of appropriate length to achieve the desired look.
Color: Select a color that closely matches your natural hair or choose contrasting shades for a bold and eye-catching style. If you’re unsure about the exact shade, consider consulting with a professional stylist who can help you find the perfect match.
Find Out Which Extension Materials Work Best for Different Braid Styles and Hair Textures
Different braid styles and hair textures require specific extension materials to ensure optimal results. Here’s a breakdown of which materials work best for various braid styles:
Box Braids: Box braids can be achieved using synthetic braiding hair or human hair extensions. Synthetic options offer a wide variety of colors and textures, while human hair provides a more natural look and feel.
Cornrows: Cornrows can be created using synthetic braiding hair or braiding-specific synthetic extensions designed to resemble natural textured hair like afro-kinky or jumbo braid styles.
Senegalese Twists: Senegalese twists typically require Kanekalon or Toyokalon synthetic fiber extensions due to their lightweight nature and ability to hold twists securely without weighing down your natural hair.
Crochet Braids: Crochet braids can be achieved using either synthetic or human hair extensions depending on the desired look and budget. Synthetic options are affordable and come in various textures, while human hair offers a more realistic appearance.
Discover Tips on Choosing High-Quality Hair Extensions That Blend Seamlessly with Your Natural Hair
When selecting high-quality hair extensions that seamlessly blend with your natural locks, keep these tips in mind:
Research Brands: Look for reputable brands known for producing high-quality hair extensions. Read reviews and seek recommendations from friends or hairstylists to ensure you’re investing in a reliable product.
Check the Texture and Color Match: Before purchasing, examine the texture and color of the extensions to ensure they closely resemble your natural hair.

Preparing Your Natural Hair and Extensions for Braiding
Wash, Condition, and Detangle Your Natural Hair
Before adding extensions to your hair, it’s crucial to prepare your natural hair properly. Start by washing your hair with a gentle shampoo that suits your hair type. This will remove any product buildup or dirt from your scalp and strands. After rinsing out the shampoo thoroughly, follow up with a nourishing conditioner to hydrate and soften your hair.
While conditioning, focus on the ends of your hair as they tend to be more prone to dryness and damage. Use a wide-toothed comb or detangling brush to gently detangle your hair from the ends upwards. Working in sections can make this process easier and prevent unnecessary breakage.
Moisturize Your Scalp for Optimal Results
Moisturizing your scalp before installing braid extensions is essential for maintaining healthy-looking braids. Apply a lightweight scalp oil or moisturizer to keep your scalp hydrated throughout the braiding process. This helps prevent itchiness, dryness, and flakiness during wear.
Take small amounts of the moisturizer or oil and massage them into your scalp using circular motions. Be sure not to apply too much product as it may weigh down your natural hair or cause buildup over time. A well-moisturized scalp promotes healthier growth and reduces potential damage caused by friction between the extensions and natural strands.
Measure, Cut, or Prepare Extensions According to Style
Choosing the right length and style of braid extensions is crucial for achieving the desired look. Depending on whether you prefer long flowing braids or shorter bob-style braids, measure or cut the extension pieces accordingly.
To measure the correct length for longer braids, hold one end of an extension strand against your natural hair strand near the roots. Extend it downwards until you reach the desired length for each braid section. Once you have determined the appropriate length, cut the extension at that point.
For shorter bob-style braids, measure and cut the extensions to your desired length before starting the braiding process. Ensure that all extension pieces are uniform in length for a neat and cohesive finished result.
Clean, Dry, and Detangle Both Natural Hair and Extensions
Before you begin braiding, it’s crucial to ensure that both your natural hair and extension pieces are clean, dry, and free from tangles. This ensures a smooth braiding process and helps prevent any unnecessary pulling or breakage.
If you’re reusing extension hair from a previous style, make sure to thoroughly wash and condition it before installing it again. This removes any dirt or product buildup that may have accumulated during previous wear.
To detangle your natural hair and extensions, use a wide-toothed comb or detangling brush. Start from the ends of your hair or extensions and work your way upwards to avoid causing additional knots or tangles. Taking this extra step will make the braiding process much easier and more enjoyable.
Follow Pre-Braiding Care Routines for Healthy-Looking Results
To achieve healthy-looking results with braid extensions, it’s essential to follow pre-braiding care routines consistently. These routines involve taking care of both your natural hair and scalp while wearing extensions.
Moisturize your scalp regularly throughout the duration of wearing braid extensions. Use lightweight oils or moisturizers specifically designed for scalp application to keep it hydrated without weighing down your hair.
Continue conditioning your natural hair while wearing braid extensions. Apply leave-in conditioners or serums to nourish and protect your strands from potential damage caused by friction between the extensions.
Remember to be gentle when styling or manipulating your braids to avoid excessive tension on your natural hair strands. Avoid tight hairstyles that can pull on the roots of your braids as this may lead to breakage or hair loss.
By following these pre-braiding care routines, you can ensure that your natural hair and extensions remain in optimal condition throughout the duration of wearing braid extensions.

Technique 1: Classic Three-strand Braid with Extensions
Learn the art of braiding with extensions
Braids are a timeless hairstyle that can elevate your look and add a touch of elegance to any occasion. But why limit yourself to just your natural hair when you can incorporate extensions for added length, volume, and versatility? So grab your favorite extensions and let’s get started!
Step-by-step instructions for seamless integration
Start by preparing your hair: Before diving into the braiding process, make sure your hair is clean and tangle-free. Comb through it gently to remove any knots or snarls that may hinder smooth braiding.
Section your hair: Divide your hair into three equal parts – left, middle, and right strands. Hold the left strand in your left hand, the right strand in your right hand, and leave the middle strand free.
Incorporating the extensions: Take a small section of extension hair and place it on top of the middle strand. This will be referred to as the “middle extension.” Now treat both the middle extension and the middle strand as one entity throughout the braiding process.
Begin braiding: Cross the left strand over the middle (including both the natural hair and extension) so that it becomes the new middle strand. Then cross the right strand over what was previously the middle strand (now including both natural hair and extension). Continue alternating between these steps until you reach desired braid length.
Maintain even tension when doing a hair extension tutorial: To ensure an evenly woven braid in your extensions, maintain consistent tension on each section as you cross them over one another. Avoid pulling too tightly or leaving them too loose; find a balance that feels comfortable yet secure.
Prevent slippage: As you progress down your braid, periodically check that the extensions are secure and haven’t slipped out. Gently tug on the braid to ensure everything is in place.
Achieve a natural and blended look
One of the key aspects of braiding with extensions is achieving a seamless blend between your natural hair and the added strands. Here are some tips to help you achieve a natural and blended look:
Extension placement: When adding the extension hair, make sure it aligns with your natural hair’s direction. This will create a cohesive appearance throughout the braid.
Strand thickness: Consider matching the thickness of your extension strands to that of your natural hair. This will help create a more realistic and balanced look.
Placement technique: Experiment with different methods for incorporating extensions into each strand. For example, you can weave them through as you cross over or add them only when crossing certain strands over others. Find what works best for you and complements your desired style.
Embrace creativity with variations
Now that you’ve mastered the classic three-strand braid with extensions, it’s time to unleash your creativity and explore different variations! Here are some popular options to get you started:
Fishtail braid: Swap out the three-strand technique for a two-strand approach. Divide your hair into two sections instead of three, then take small sections from each side, crossing them over one another until reaching the end.
Dutch braid: Begin by dividing your hair into three sections at the crown of your head. Instead of crossing strands over one another like in a regular braid, cross them under each other while incorporating additional hair from each side as you go along.
French braid: Similar to the Dutch braid, but instead of crossing under, cross strands over each other while adding extra hair from both sides as you progress down the braid.
Remember, practice makes perfect! Don’t be afraid to experiment with different braiding techniques and styles until you find the perfect look that showcases your unique personality. So grab those extensions, get creative, and rock your braid with confidence!

Amount of extension hair used may vary depending on desired thickness and length.
Technique 2: Fishtail Braid with Extensions
Master the art of creating a trendy fishtail braid using hair extensions.
Creating a fishtail braid with extensions is a fantastic way to add volume and texture to your hairstyle. With our detailed instructions, you’ll be able to achieve a flawless fishtail braid that will turn heads wherever you go.
To start, gather your hair extensions and make sure they are properly prepared for braiding. Using your ring finger, middle finger, and index finger, separate the hair into two equal sections. Take a small strand from the outer edge of the left section and cross it over to join the right section. Repeat this step on the opposite side by taking a small strand from the outer edge of the right section and crossing it over to join the left section.
Continue alternating between these steps, always taking small strands from the outer edges of each section and crossing them over to join the opposite side. As you progress down your hair, make sure to keep each section tightly secured by using your fingers or a clip.
Follow our detailed instructions on adding extensions to achieve a voluminous and textured fishtail braid.
When adding extensions for a fishtail braid, it’s important to ensure they blend seamlessly with your natural hair. To do this, follow these steps:
Prepare your extensions: Before starting, make sure your extensions are clean and free from tangles. Comb through them gently with a wide-toothed comb or brush designed for use with extensions.
Section your hair: Divide your natural hair into two equal sections using your ring finger, middle finger, and index finger as guides. Clip one side away while you work on the other.
Attach the extension: Take one extension piece and position it at an angle so that it aligns with one of the sections of hair. Begin incorporating it into the braid by treating it as if it were a part of your natural hair. Cross it over to the opposite section and continue braiding.
Repeat on the other side: Once you’ve reached the end of the first extension, secure it in place with a small elastic band. Then, unclip the other section of your natural hair and repeat the process with another extension piece.
Continue braiding: Keep adding extensions and crossing them over until you reach the desired length for your fishtail braid. Secure the end with an elastic band, making sure everything is tightly woven together.
By following these steps, you’ll be able to achieve a voluminous and textured fishtail braid that incorporates extensions seamlessly into your hairstyle.
Learn how to section and weave the hair strands correctly for a flawless fishtail braiding technique.
To create a flawless fishtail braid with hair extensions, proper sectioning and weaving techniques are crucial. Here’s how you can achieve perfection.
Divide your hair into two equal sections using your ring finger, middle finger, and index finger as guides. Hold one side with a clip while you work on the other.
Take a small strand from the outer edge of one section (let’s call it Section A) using your index finger or thumb.
Cross this strand over to join the opposite section (Section B). Make sure to keep each section tightly secured as you go along by using your fingers or clips.
Now, take a small strand from the outer edge of Section B using either your ring finger or middle finger.
Cross this strand over to join Section A, just like in step 3.
Repeat steps 2-5 until you reach near the end of your hair length or desired point for finishing off the braid.
Securely tie off your fishtail braid with an elastic band so that it stays intact throughout the day.
By following these sectioning and weaving techniques, you’ll be able to achieve a flawless fishtail braid that will make heads turn.
Discover tips for achieving a neat and polished fishtail braid while incorporating extensions seamlessly.
To ensure your fishtail braid looks neat, polished, and seamlessly incorporates extensions, here are some valuable tips:
Choose the right color: Select hair extensions that closely match your natural hair color. This will help them blend in seamlessly and create a cohesive look.
Trim the extensions: If your extensions are longer than your natural hair, consider trimming them to match the desired length of your braid. This will prevent any unevenness or awkward gaps in the final result.
Technique 3: Dutch Braid with Extensions
Explore the Dutch braiding technique enhanced by the addition of hair extensions.
Dutch braids are a popular and stylish way to wear your hair. By incorporating hair extensions into this braiding technique, you can take your hairstyle to the next level. The addition of extensions not only adds length and volume but also allows for more creativity and versatility in your look. Whether you want to achieve a bold, statement-making style or simply enhance the natural beauty of your hair, Dutch braiding with extensions is an excellent choice.
Follow our step-by-step guide on incorporating extensions into a Dutch braid for added length and volume.
If you’re ready to try out this stunning hairstyle, we’ve got you covered with a detailed step-by-step guide. Here’s how you can incorporate extensions into a Dutch braid:
Start by preparing your hair: Before beginning the braiding process, make sure your hair is clean, dry, and free from any tangles or knots. This will ensure that the braid looks neat and polished.
Choose the right type of extensions: Select high-quality hair extensions that closely match your natural hair color and texture. This will help create a seamless blend between your own hair and the added strands.
Section off your hair: Divide your hair into three equal sections – left, right, and center – just like you would for a regular Dutch braid.
Begin braiding: Take one section of extension hair along with one section of your natural hair to start the braid. Cross the extension strand under the middle strand while crossing it over the other natural strand.
Continue adding in extensions: As you continue braiding down towards the nape of your neck, keep adding small sections of extension hair along with each natural strand before crossing them over each other.
Secure the braid: Once you reach the end of your hair, secure the braid with a hair tie or an elastic band. You can also use bobby pins to keep any loose strands in place.
Learn how to create an inverted or reverse French braid effect using this unique braiding method combined with extensions.
One of the great advantages of incorporating extensions into a Dutch braid is the ability to create different effects and styles. By following this technique, you can achieve an inverted or reverse French braid effect. Here’s how:
Start by sectioning off your hair: Divide your hair into three sections – left, right, and center – just as you would for a regular Dutch braid.
Begin braiding: Take one section of extension hair along with one section of your natural hair to start the braid. Instead of crossing the strands under each other like in a traditional Dutch braid, cross them over each other.
Continue adding extensions: As you continue braiding down towards the nape of your neck, add small sections of extension hair along with each natural strand before crossing them over each other.
Create an inverted effect: To achieve the inverted or reverse French braid effect, make sure to cross the strands over each other instead of under as you continue braiding downwards.
Secure the braid: Once you reach the end of your hair, secure the braid with a hair tie or elastic band and use bobby pins if needed to hold any loose strands in place.
Find out how to maintain clean sections while weaving in the additional hair strands during Dutch braiding.
Maintaining clean sections while incorporating extensions into a Dutch braid is essential for achieving a polished look. Here are some tips on how to ensure clean sections throughout the process:
Use small clips or clear elastics to separate and secure each section before starting the braiding process.
Take your time and work methodically from one section to another, ensuring that the added strands are evenly distributed and integrated with your natural hair.
Comb through each section before adding extensions to remove any tangles or knots that may interfere with the braiding process.
Keep a mirror handy to check your progress and make any necessary adjustments as you go along.
If you notice any uneven sections or loose strands, gently unravel the braid and rework that particular area until it looks neat and tidy.
Achieve an intricate, eye-catching look by mastering the Dutch braid technique with added extension pieces.
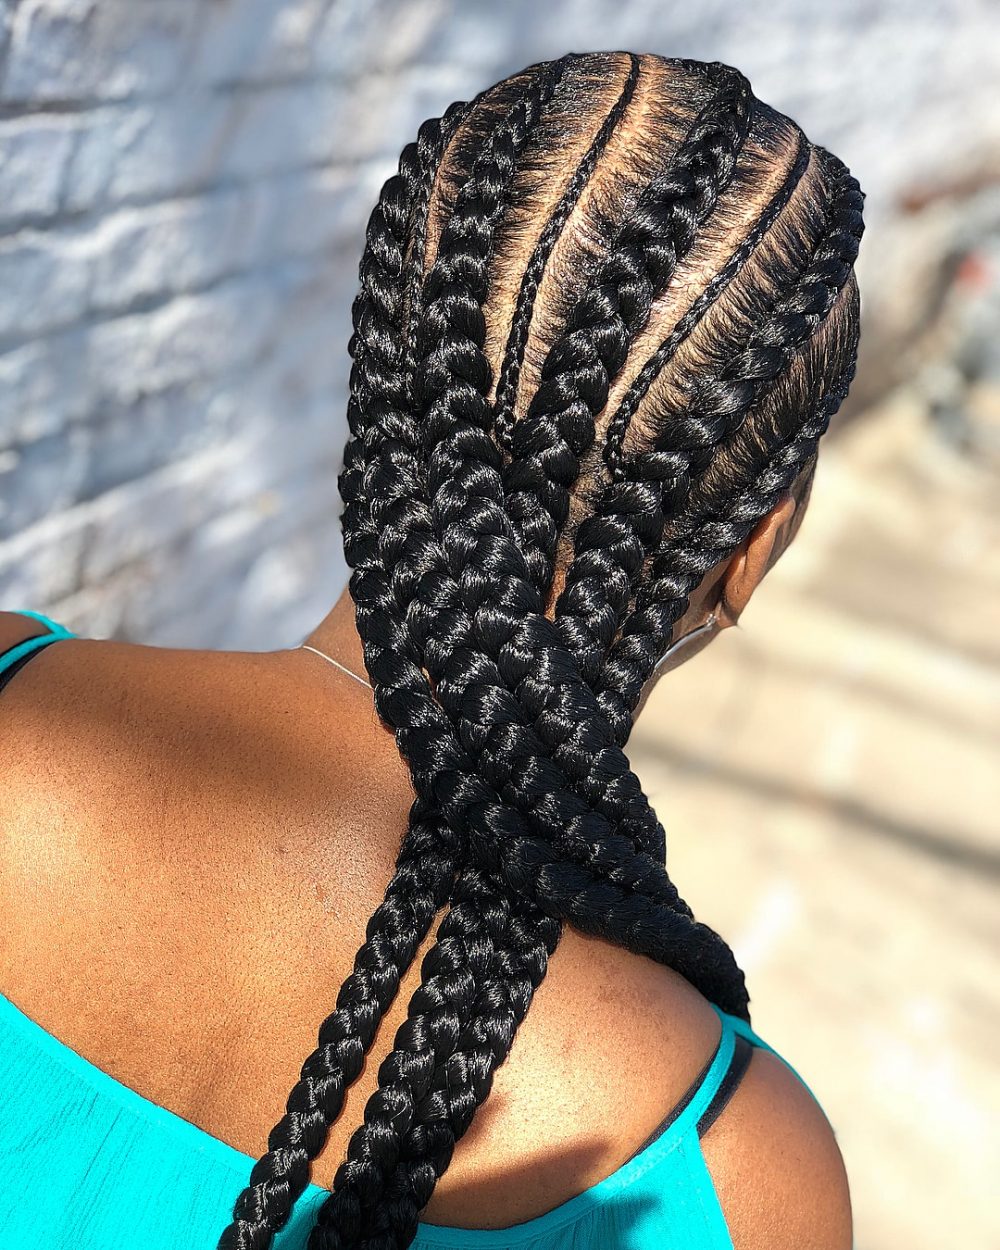
Technique 4: Cornrows with Hair Extensions
Creating stunning cornrows is made even more stylish by integrating hair extensions into the traditional braiding method. With our detailed instructions, you’ll learn how to achieve flawless cornrows by parting, sectioning, and attaching extension pieces with ease. Mastering proper tension control when adding extensions will ensure your cornrows look neat and even. Get ready to discover tips for creating intricate patterns and designs using hair extensions, while experimenting with different colors or textures to enhance the visual impact of your cornrow style.
Parting and Sectioning: The Foundation of Flawless Cornrows
To create beautiful cornrows with hair extensions, it’s crucial to start with proper parting and sectioning techniques. Here’s a step-by-step guide:
Begin by thoroughly detangling your natural hair using a wide-tooth comb or brush.
Using a rat-tail comb, create a straight part from the front of your head to the nape of your neck.
Divide this section into smaller segments depending on how many cornrows you want to create.
Clip away the sections that are not currently being worked on to keep them organized and out of the way.
Repeat steps 2-4 for each subsequent row until all desired sections are prepared.
Remember, clean and precise partings will contribute to the overall polished look of your cornrows.
Attaching Extension Pieces: Achieving Neatness and Volume
Now that you have properly parted and sectioned your hair, it’s time to attach the extension pieces for added length or volume. Follow these steps for seamless integration:
Take a small section of extension hair that matches or complements your natural hair color.
Fold this section in half so that it forms a loop at one end.
Place the loop over the base of one of the parted sections close to your scalp.
Divide the natural hair and extension hair into three equal strands to start your cornrow braid.
Begin braiding by crossing the right strand over the middle strand, then the left strand over the new middle strand.
As you continue braiding, add a small amount of extension hair to each section before crossing it over.
Maintain consistent tension throughout the braid to ensure a neat and even appearance.
By following these steps, you’ll achieve seamless integration of extension hair into your cornrows, resulting in a flawless finished look.
Creating Intricate Patterns: Unleash Your Creativity
One of the most exciting aspects of cornrows with extensions is the ability to create intricate patterns and designs. Here are some tips to help you unleash your creativity:
Experiment with different parting techniques: Try diagonal or zigzag partings for unique designs that stand out.
Play with different sizes: Varying the thickness of each cornrow can add visual interest to your overall style.
Incorporate geometric shapes: Use smaller sections of extension hair to form triangles, squares, or diamonds within your cornrows.
Add accessories: Enhance your design by incorporating beads, cuffs, or colored elastics for an extra touch of flair.
Don’t be afraid to let your imagination run wild when creating intricate patterns with cornrows and extensions. The possibilities are endless!
Enhancing Visual Impact: Colors and Textures
To take your cornrow style to the next level, consider experimenting with different colors or textures of extension hair. Here’s how you can enhance the visual impact:
Opt for ombre or highlights: Choose extension hair that features a gradual color transition or highlights that complement your natural hair color.
Try contrasting colors: For a bold and eye-catching look, select extension hair in a contrasting shade from your own hair color.
Embrace textured extensions: If you desire added volume or a more natural look, consider using textured extension hair that matches your hair’s natural texture.
By incorporating different colors and textures into your cornrows, you’ll create a visually striking hairstyle that reflects your unique style and personality.
Achieving a Professional Look: Tips and Tricks for Neat Braids
Learn the Expert Techniques for Clean, Polished Braids
It’s essential to learn the expert techniques that can help you create clean and polished braids. One of the first things to keep in mind is the tool you use. Opt for a fine-toothed comb or a rat-tail comb to ensure precision while sectioning your hair and extensions. This will help you achieve neat partings, resulting in well-defined braids.
To start your braid, take a small section of your natural hair along with an equal-sized portion of extension hair. Hold both sections between your fingers and cross them over each other, creating the foundation for your braid. As you continue braiding, make sure to maintain consistent tension throughout the process. This will give your braids a sleek and professional appearance.
Preventing Frizz, Flyaways, and Unruly Strands
Nothing ruins a perfectly styled braid more than frizz, flyaways, or unruly strands peeking out from all directions. To prevent this common issue when working with braid extensions, there are several tricks you can employ.
Before starting your braids, apply some anti-frizz serum or lightweight oil to your natural hair and extension hair. This will help tame any frizz and keep flyaways at bay throughout the day. Using edge control gel or pomade around your hairline can help smooth down any baby hairs or stray strands that tend to escape from your braids.
Another useful tip is to avoid excessive manipulation of the braided sections once they’re complete. Constant touching and pulling can lead to frizz and disrupt the overall neatness of your style. Instead, gently secure any loose ends with small rubber bands or clips if necessary.
Securing Ends Neatly and Securely
To achieve a professional look, it’s crucial to secure the ends of your braids neatly and securely. Leaving loose or messy ends can detract from the overall polished appearance you’re aiming for. Here are some methods to ensure your braid ends stay in place:
Rubber Bands: Using small, clear rubber bands is a popular choice for securing braid ends. Take a small section of hair at the end of your braid and wrap the rubber band tightly around it. This will keep the braid intact while maintaining a clean finish.
Heat Sealing: If you’re working with synthetic hair extensions, heat sealing is an effective technique to prevent unraveling. Gently apply heat to the end of each braid using a flat iron or hot water (if recommended by the manufacturer). This will melt the fibers together, creating a secure bond.
Thread Wrapping: For a more decorative finish, you can wrap thread around the ends of your braids. Choose a thread color that complements your hair or extension shade and wrap it tightly around the base of each braid multiple times. Knot the thread securely and trim any excess for a neat result.
Hiding Extension Attachment Points for Seamless Finish
When incorporating extensions into your braids, hiding their attachment points is essential for achieving a seamless finish. Here are some tips on how to do it like an expert:
Cornrows: When adding extensions through cornrows, make sure to position them close to your scalp as you braid along. This will help conceal any visible attachment points by ensuring they remain hidden beneath subsequent rows of braids.
Crochet Braids: Crochet braiding involves attaching extensions onto pre-existing cornrows using a crochet hook or needle tool. To create an invisible look, insert the hook beneath each cornrow when attaching the extension hair, ensuring that no attachment points are visible on the surface.
Individual Braids: If you’re adding extensions to individual braids, ensure that the attachment points are concealed within the braid itself. As you incorporate the extension hair, make sure it seamlessly blends with your natural hair, hiding any visible signs of attachment.
Mastering Consistent Tension for a Professional Look
Maintaining consistent tension throughout your braiding process is crucial for achieving a professional look. Inconsistent tension can result in lumpy or uneven braids, which may not give off the polished appearance you desire. Here’s how to master this aspect:
Practice and Patience: Achieving consistent tension requires practice and patience. Take your time when sectioning your hair and extensions, ensuring each strand is held firmly but not too tightly as you braid.
Mirror Check

Styling Options for Braided Extensions: Crochet Braids and Box Braids
Explore Popular Styling Options with Crochet Braids and Box Braids
Braid extensions are a fantastic way to switch up your hairstyle and add length, volume, and versatility to your look. Two popular styling options for braided extensions are crochet braids and box braids. Let’s dive into these styles and discover how you can achieve them effortlessly.
Creating Trendy Box Braids Using Hair Extensions
Box braids have been a go-to style for many years, known for their timeless elegance and low-maintenance appeal. To create box braids using hair extensions, follow these steps:
Start by sectioning your hair into small squares or rectangles using a rat-tail comb.
Take a small section of extension hair that matches the color and texture you desire.
Attach the extension hair to your natural hair by using the “feed-in” method or individual braid technique.
Begin braiding your natural hair along with the extension hair, ensuring each braid is neat, secure, and uniform in size.
Continue this process until all sections of your hair are transformed into beautiful box braids.
To finish off the style, dip the ends of each braid in hot water to seal them.
Box braids offer endless possibilities. You can experiment with different lengths, thicknesses, colors, or even accessorize them with beads or cuffs for added flair.
Selecting the Right Size, Length, and Texture of Extension Hair
When choosing extension hair for crochet or box braid styles, it’s essential to consider factors such as size, length, and texture to achieve your desired look.
For crochet braids:
Opt for smaller-sized curl patterns like deep wave or tight coils if you want a more natural-looking result.
Longer lengths work well for creating voluminous and flowing hairstyles.
If you prefer a sleeker appearance, consider using straight or wavy extension hair.
For box braids:
Smaller-sized braids usually result in a more intricate and detailed look.
Longer lengths can provide versatility, allowing you to experiment with different updos or ponytail styles.
Textured extension hair, such as synthetic Kanekalon or Marley hair, helps achieve the signature “grip” that keeps box braids secure.
Remember to choose high-quality extension hair that matches your natural hair color and blends seamlessly for a flawless finish.
Maintaining Your Braided Styles While Keeping Your Natural Hair Healthy
Maintaining your natural hair underneath braided extensions is crucial to ensure its health and vitality. Here are some tips for maintaining your style while keeping your natural hair healthy:
Moisturize: Apply a lightweight leave-in conditioner or moisturizer to your scalp regularly to prevent dryness and itching.
Cleanse: Use a diluted shampoo solution or cleansing spray to cleanse your scalp without disturbing the braids. Focus on the roots and avoid excessive manipulation.
Protect at night: Wrap your braids in a satin scarf or sleep on a satin pillowcase to minimize friction and protect against breakage.
Avoid tension: Ensure that your braids are not too tight, as this can cause unnecessary strain on your scalp and natural hair.
Limit style changes: While it’s tempting to switch up hairstyles frequently, try not to manipulate the braids too often as this can lead to frizzing or premature loosening of the style.
By following these maintenance tips, you can enjoy longer-lasting braid extensions while promoting healthy growth of your natural hair.
Various Ways to Style Crochet or Box Braids Once Installed
One of the best things about crochet braids and box braids is their versatility. Here are some ideas to inspire you:
Half-Up, Half-Down: Gather the top half of your braids into a high ponytail or bun while leaving the rest of the braids flowing freely.
Updo with Accessories: Create an elegant updo by twisting or braiding sections of your braids and securing them with decorative hairpins or clips.
Side Swept: Sweep all your braids to one side for a glamorous and asymmetrical look.
Braided Crown: Take two sections of your box braids and braid them towards the back, creating a crown-like effect around your head.
High Ponytail: Gather all your braids into a high ponytail for a sleek and stylish look.
Feel free to experiment with these styles or create your own unique looks that showcase your personality and individuality!
Maintaining and Caring for Your Braided Extensions
Essential Maintenance Routines: Keeping Your Braided Extensions Fresh and Intact
Maintaining your braided extensions is crucial to ensure they stay looking fresh and intact throughout their lifespan. By following a few essential maintenance routines, you can keep your braids in top shape.
Regular Washing: Contrary to popular belief, washing your braided hairstyle is necessary to maintain cleanliness and prevent product buildup. However, it’s important to strike a balance between cleanliness and longevity. Aim to wash your braids every two weeks using a gentle sulfate-free shampoo diluted with water. Gently massage the scalp without disturbing the braids themselves, then rinse thoroughly.
Moisturizing Your Natural Hair: Moisturizing both your natural hair and the extension pieces is vital for overall hair health while wearing braided styles. Use a lightweight leave-in conditioner or moisturizing spray to hydrate your natural hair underneath the extensions regularly. Apply the product directly to your scalp and gently massage it in, ensuring proper moisture distribution.
Protective Styling at Night: Before going to bed, wrap your braids with a satin scarf or sleep on a satin pillowcase to prevent friction that can cause frizzing or tangling. This simple step helps preserve the integrity of your braided style overnight.
Avoid Excessive Manipulation: While it may be tempting to constantly touch or style your braids, excessive manipulation can lead to premature unraveling or damage. Try not to pull on individual braids or excessively brush them throughout the day.
Proper Techniques: Detangling and Preventing Matting in Braid Extensions
Detangling braid extensions requires care and patience to avoid causing damage or matting. Here are some proper techniques you should follow:
Use Fingers First: Begin by gently running your fingers through the length of each braid to identify any knots or tangles. This helps you locate problem areas without causing unnecessary tension.
Apply Detangling Spray: Once you’ve identified tangled sections, apply a detangling spray or lightweight oil to help loosen the knots. Use your fingers or a wide-tooth comb to gently work through the tangles, starting from the ends and working your way up toward the roots.
Avoid Harsh Combing: When using a comb, opt for a wide-toothed one specifically designed for detangling hair. Avoid using fine-toothed combs as they can cause breakage or snag on the braids.
Prevent Matting: To prevent matting in your braid extensions, avoid excessive rubbing of your scalp while washing and drying your hair. Refrain from piling wet hair on top of your head as this can create tangles and lead to matting.
Protecting Your Edges and Scalp: Long-Term Care for Braided Styles
Wearing long-term protective styles like braided extensions requires extra attention to protect your edges and scalp from damage. Here’s what you need to know:
Avoid Tension: Ensure that your braids are not too tight around the edges and hairline as this can cause traction alopecia—a condition characterized by hair loss due to excessive tension on the follicles. If you feel discomfort or notice redness along the hairline, consider loosening the braids slightly.
Scalp Care: Keep your scalp healthy by regularly applying a lightweight oil such as jojoba or coconut oil to soothe any dryness or itchiness caused by wearing braided extensions. Gently massage the oil into your scalp using circular motions for improved blood circulation.
Protective Styling: When participating in activities that may expose your braids to potential damage, such as swimming or exercising, consider wearing a protective style like a swim cap or headband to shield the braids from chlorine, saltwater, or excessive sweat.
Regular Check-Ups
Embrace the Beauty and Versatility of Braid Extensions
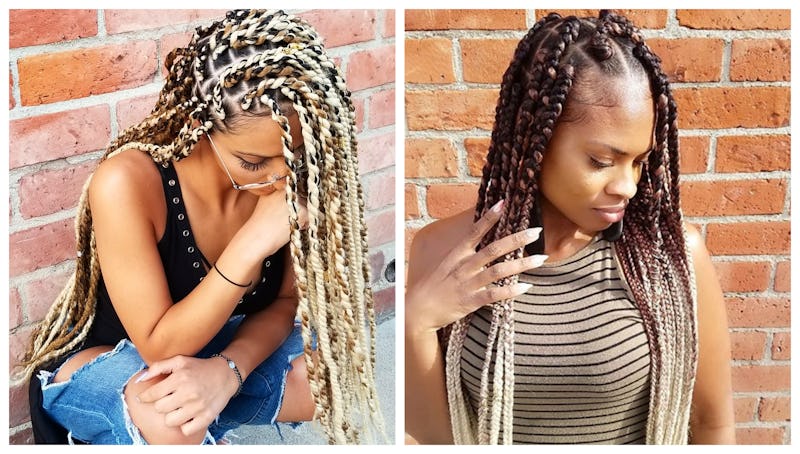
Braid extensions offer a world of possibilities. With step-by-step instructions, you can easily achieve stunning braided styles that will turn heads wherever you go. From classic three-strand braids to intricate Dutch braids, fishtail braids, and cornrows, the options are endless. Let’s explore the basics of braid extensions and discover how you can achieve a professional look while maintaining and caring for your new hairstyle.
In order to get started with braid extensions, it is important to choose the right type of hair extensions that suit your needs. Whether you opt for synthetic or human hair extensions, consider factors such as texture, color match, and desired length. Selecting high-quality hair extensions will ensure a seamless blend with your natural hair and longevity in your chosen style.
Before diving into the braiding process, it is crucial to prepare both your natural hair and the extensions properly. This includes detangling your hair, washing it thoroughly, and ensuring it is completely dry before beginning the braiding process. Prepping the extensions by separating them into manageable sections will make the styling process much easier.
Once everything is prepared, you can start experimenting with various braid extension techniques. The classic three-strand braid with extensions provides a timeless look that suits any occasion. If you’re looking for something more intricate and eye-catching, try out fishtail braids or Dutch braids using extensions for added thickness and length. For those who prefer a sleeker style closer to the scalp, cornrows with hair extensions are an excellent choice.
To achieve a professional look with your braid extensions, there are some tips and tricks worth considering. Keeping tension consistent throughout each braid will create neatness and uniformity in your hairstyle. It’s also helpful to use small rubber bands or thread at the base of each braid to secure it tightly. This will prevent any unraveling and keep your style intact for longer periods.
Styling options for braided extensions are not limited to just one type of braid. Crochet braids and box braids are popular choices that allow you to express your creativity while maintaining a protective hairstyle. Crochet braids involve attaching pre-braided extensions onto cornrows, while box braids offer versatility in terms of length, thickness, and styling options.
Once you have achieved your desired look with braid extensions, it is important to know how to maintain and care for them properly. Regularly moisturizing your scalp and hair will prevent dryness and breakage. Sleeping with a satin or silk bonnet or pillowcase can help preserve the longevity of your style by reducing friction.
In conclusion, braid extensions provide an exciting opportunity to embrace the beauty and versatility of different hairstyles. By following step-by-step instructions and choosing the right hair extensions, you can achieve stunning looks ranging from classic three-strand braids to intricate Dutch braids and cornrows. With tips on achieving a professional appearance, styling options like crochet braids and box braids, as well as proper maintenance techniques, you can confidently rock your braid extensions with style.
FAQs
Q: How long do braid extensions typically last?
A: The durability of braid extensions depends on various factors such as the quality of the hair used, maintenance routine, and personal lifestyle. On average, they can last anywhere from two to eight weeks.
Q: Can I wash my hair with braid extensions?
A: Yes! It’s essential to keep both your natural hair and the extensions clean. However, be gentle when washing so as not to disturb or loosen the braids.
Q: Can I swim or exercise with braid extensions?
A: Absolutely! Braid extensions are designed for an active lifestyle. However, it’s important to rinse your hair thoroughly after swimming to remove any chlorine or saltwater residue.
Q: How can I prevent my scalp from itching with braid extensions?
A: To alleviate itchiness, you can use a scalp oil or spray designed specifically for braided hairstyles. Applying it directly to the scalp will provide relief and keep your hair healthy.
Q: Can I style my braid extensions in different ways?
A: Yes! Braid extensions offer versatility in styling. You can experiment with updos, half-up styles, ponytails, or even accessorize with beads or other decorative elements.
Q: Are braid extensions suitable for all hair types?
A: Braid extensions can be adapted to suit various hair types. Whether you have straight, wavy, curly, or coily hair, there are techniques and extension options available that will work for you.
Q: Do braid extensions cause damage to natural hair?
A: When installed correctly and maintained properly, braid extensions should not cause damage to your natural hair. However, it is essential to follow proper installation and maintenance practices to minimize any potential risks.
Q: Can I dye my braid extensions a different color?
A: It is generally not recommended to dye synthetic hair extensions as they may not react well to color treatments. If you are using human hair extensions, consult a professional stylist for safe coloring options.
Q: Can I reuse braid extensions after taking them out?
A: Depending on the quality of the hair used and how well they were cared for during wear, some types of braid extensions can be reused multiple times. Properly storing them when not in use will help maintain their condition for future wear.


